Published on
August 24, 2026


Most API problems start before launch. If I had to boil this article down to one point, it’s this: I should not give a partner production API access until seven checks are done in order.
Here’s the full flow in plain English:
A few numbers show why this matters: 60% of groups had an API-related breach in the last two years, 92% had at least one API security incident in the last 12 months, and downtime can cost $5,600 per minute for mid-market U.S. companies.
| Step | What I check | Why it matters |
|---|---|---|
| 1 | Partner fit | Stops low-return integrations early |
| 2 | Data scopes | Cuts data exposure risk |
| 3 | Compliance and security | Flags legal and security gaps |
| 4 | Sandbox setup | Gives a safe place to build and test |
| 5 | Test cases | Finds failures before launch |
| 6 | Production readiness | Lowers go-live risk |
| 7 | Ownership handoff | Keeps the partnership under control after launch |
If I follow this order, I get a cleaner launch path, fewer surprises, and a clear record of who approved what and when.
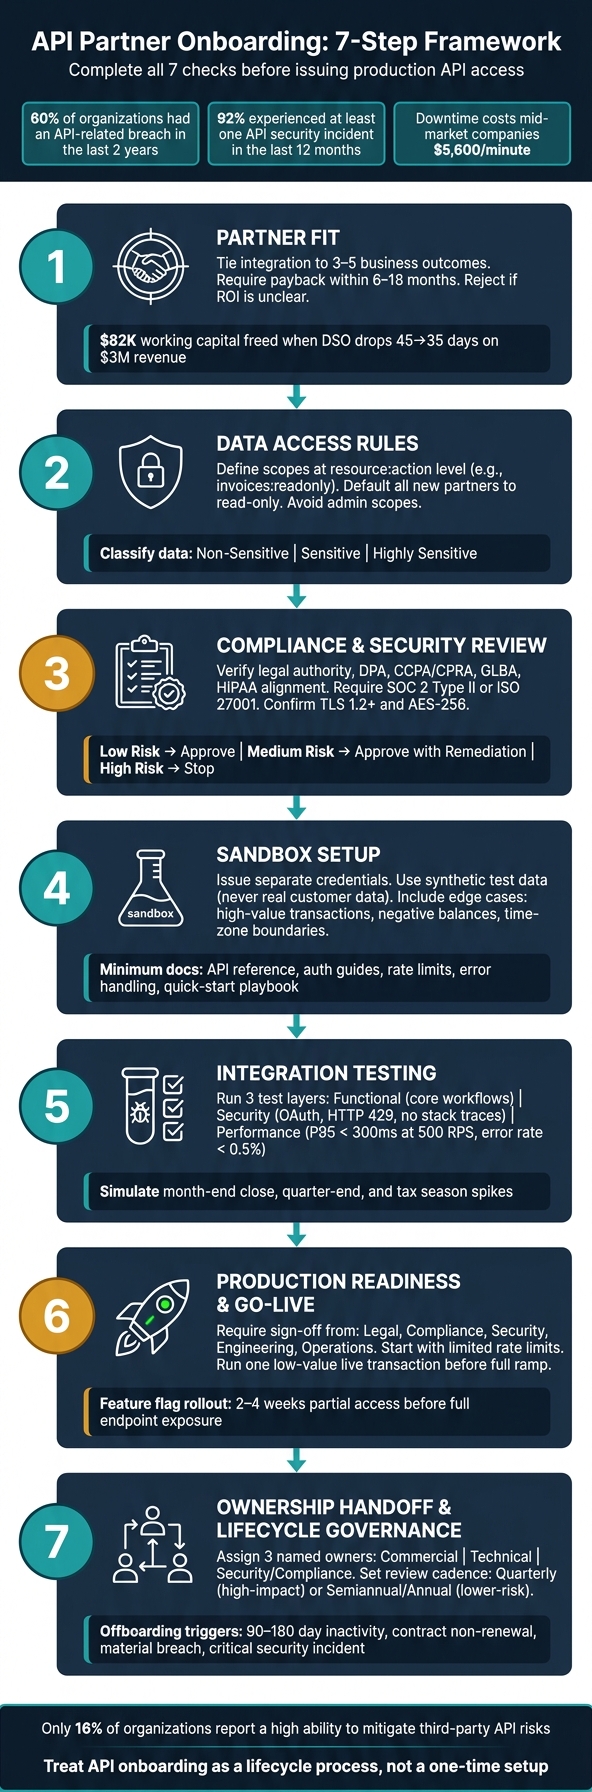
API Partner Onboarding: 7-Step Framework for Secure Integrations

These first two gates need to happen before your engineering team writes a single line of code. That upfront work can save a lot of wasted effort and help you avoid data exposure issues that are much harder to clean up after launch.
Start by tying each integration to 3–5 measurable outcomes. That could mean lower DSO, fewer reconciliation hours, or fewer order errors. The point is simple: if the use case doesn’t lead to a clear business return, it shouldn’t move forward.
Here’s a concrete example. An accounts receivable integration that moves DSO from 45 days to 35 days for a company with $3,000,000 in annual revenue can free up roughly $82,000 in working capital. That’s the kind of math that makes a partnership worth pursuing, often with the guidance of fractional CFO services. If you can’t show payback within 6–18 months, stop the onboarding process and reject the partnership.[4]
You also need proof that the partner is ready from a technical and operational standpoint. Ask for:
Don’t stop at the checklist. Verify that the sandbox uses realistic test data and that its credentials are fully separate from production.[2]
To keep decisions consistent, use an intake form and a cross-functional approver group to approve, defer, or reject the partner.[4]
If the partner clears the fit review, set the minimum data it can access before any technical work begins.
Scope is the main control point for limiting risk before compliance review starts. Begin by classifying data into non-sensitive, sensitive, and highly sensitive tiers before assigning access.
From there, apply the principle of least privilege. In plain English: partners should only get the minimum data their use case needs. Scopes should be defined at the resource:action level, such as invoices:readonly, payments:write, and customers:readonly.
Default all new partners to read-only access. Only approve write access when there’s a documented need. And admin scopes? Avoid them unless the risk is written down and formally approved.
| Data Type | Example Fields | Recommended Default Scope |
|---|---|---|
| Financial | Invoice headers, payment statuses, due dates | invoices:readonly |
| Customer (PII) | Names, email addresses, phone numbers | customers:readonly |
| Operational | Order status, inventory counts, system events | orders:readonly |
| Highly Sensitive | Bank account numbers, Social Security numbers, full card data | Avoid direct API exposure |
Put those rules in writing with a data-sharing addendum. It should spell out retention, consent withdrawal, stop-processing deadlines, deletion or anonymization timing, and access-log requirements. For every access event, log the partner, the data involved, the timestamp, and the source.[3]
Once those access rules are locked in, move into compliance and security review.
With partner fit confirmed and data scopes locked, the next three steps shift from policy to execution. This is the point where onboarding either starts to look solid or starts to crack.
Before you issue any credentials, run a structured review across three gates: legal authority, privacy, and security.
On the legal side, confirm the partner’s legal status and authority to contract. Review the data processing agreement (DPA) too. On the privacy side, check alignment with the U.S. rules that apply to the data in scope: CCPA/CPRA for California residents, GLBA for financial institutions, and HIPAA when protected health information is involved. Document data retention policies, data minimization practices, and consent mechanisms.
For security, ask for current evidence, not verbal assurances. That means SOC 2 Type II reports or ISO 27001 certificates, with the report period and scope checked. If SOC 2 is not available, accept ISO 27001, pen-test summaries, or security questionnaires, and record the gap.[6] Also verify encryption standards - TLS 1.2+ in transit and AES-256 at rest - plus incident response plans with clear notification timelines and authentication methods such as OAuth 2.0 and MFA for sensitive operations.
Business due diligence should cover the partner’s financial health and any concentration risk if the API will sit in a revenue, payments, or reporting flow. If the integration touches payments, lending, or financial reporting, review chargeback and fraud exposure, data reconciliation processes, and audit trails as well.
A simple three-tier decision framework keeps this step clear:
| Finding Severity | Example | Decision |
|---|---|---|
| Low risk | Minor documentation gaps | Approve |
| Medium risk | Incomplete logging, limited MFA coverage | Approve with remediation (set deadlines and owners) |
| High risk | No incident response plan, weak encryption, regulatory non-compliance | Stop onboarding until corrected |
For growth-stage companies handling payments, lending, or financial reporting data, assess operational resilience too. That includes uptime SLAs, disaster recovery plans, recovery time objectives (RTOs), and recovery point objectives (RPOs).
If the partner clears this step, issue sandbox access next.
After compliance clears, provision sandbox access in a set order.
First, the partner registers an app in your developer portal, provides redirect URIs for OAuth, and declares the allowed scopes. Next, you issue credentials - API keys or OAuth client ID/secret pairs. Store them in a secure vault, rotate them from day one, and limit them to sandbox use. Only issue the scopes approved in Step 2. Confirm named business, technical, and security contacts before the first credential is issued.[5]
The sandbox should behave like production. What it should never contain is real customer data. Use synthetic datasets that match realistic U.S. formats, such as currency shown as $1,234.56, dates shown as 08/25/2026, and account structures that reflect actual transaction volumes. Include edge cases too: high-value transactions, negative balances, and time-zone boundary cases across U.S. time zones from Eastern through Pacific. A factory reset feature, so partners can return to a known baseline state, makes test cycles repeatable and cuts debugging time.[11][14]
The minimum documentation set that should come with sandbox access includes:
It also helps to wire in observability from the start. Every request should carry an X-Correlation-ID from gateway to response.[12][13] Logs should be structured in JSON with standard fields like timestamp, level, service, environment, route, method, status_code, duration_ms, and error details.[10]
Use the sandbox from Step 4 to validate the exact scopes, auth, and limits already approved. Testing should cover three separate layers before anyone gets near production.
Functional tests check core workflows from end to end: creating a customer, posting a transaction, retrieving an account balance, and generating a report. Each test case needs a clear precondition, input payload, expected response, and an explicit pass/fail rule. Edge cases matter just as much as the happy path. That includes missing required fields, duplicate requests, out-of-range USD amounts, and concurrent updates to the same resource.
Security tests should validate OAuth 2.0 flows and confirm that expired tokens are rejected cleanly. Check that error responses never expose stack traces, internal IDs, or system paths. Test rate limiting by sending traffic above documented thresholds and confirm that the API returns HTTP 429 with a Retry-After header.[7][8]
Performance tests should match realistic U.S. usage patterns. For APIs that support accounting or FP&A workflows, that means simulating spikes during month-end close, quarter-end reporting, and tax season. Define thresholds tied to service-level objectives, such as P95 latency under 300 ms at 500 RPS and an error rate below 0.5%.[9] If any threshold fails, treat it as a go-live blocker.
Summarize failures, fixes, and open risks so Step 6 can judge launch readiness.
Testing may be done, but this is the point where things can still go wrong. The last two steps decide if the integration goes live without drama and whether it stays in good shape after launch.
Once sandbox testing is done, move to final production approval. Production access should only be granted after legal, compliance, security, engineering, and operations all sign off.
Each group makes one clear launch-readiness call:
Track approval in a go-live checklist with named owners, due dates, and required fields. Production credentials should only be issued after a designated approver marks every item complete.
When you do provision production credentials, start small. Set initial rate limits and quotas based on projected usage, not peak capacity. If a partner handles payments or financial data, apply daily transaction limits in USD so your technical controls match your financial risk tolerance. Many API providers also turn on only part of the endpoint set for the first 2–4 weeks with feature flags, then expand access after traffic patterns look steady.
That caution has a clear business case. For mid-market U.S. companies, downtime averages $5,600 per minute, and one API outage can cost $5,000 to $100,000 per hour depending on how tied the integration is to revenue.[15][16]
Before you open full traffic, run a low-value live transaction in production. That gives you one last check that the integration behaves the way you expect outside the sandbox.[17][18] If it passes, ramp traffic up gradually and keep monitoring dashboards visible to both your team and the partner’s technical contact.
After launch approval, hand off ownership for day-to-day management. Before go-live, assign three named owners: Commercial, Technical, and Security/Compliance.
Store those assignments in a central partner record, along with escalation paths and backup contacts. Then, within one week of launch, hold a handoff meeting. The onboarding team should walk the ongoing owners through the integration, known risks, support expectations, and current metrics.
Once the integration is live, manage it with the same care you used during onboarding. Treat each API partnership like a product that needs regular check-ins, not something you launch and forget. A tiered review cadence works well: quarterly for high-impact partners, and semiannual or annual for lower-risk ones.[19][20]
Each review should cover the basics below:
| Review Area | What to Check |
|---|---|
| Access | Scopes, permissions, least-privilege adherence, key rotation status |
| Performance | Latency, error rates, revenue contribution, user adoption |
| Compliance/Security | Updated certifications, penetration test recency, incident history |
Offboarding triggers should also be spelled out in both contracts and internal policy. Common triggers include 90- or 180-day inactivity, contract non-renewal, material breach, or a critical security incident.[1][19][20] When one of those triggers is met, notify the partner based on the notice periods in the contract, coordinate a wind-down plan for dependent systems, revoke or limit credentials, and handle data disposition according to your DPA.
A disciplined onboarding process does more than cut launch-day risk. It gives your team a repeatable system that can grow without turning into chaos. The seven steps - partner fit, data access rules, compliance checks, technical setup, test cases, launch readiness, and handoff to account management - work best as a controlled sequence, with each stage setting up the next.
That structure matters because API risk is still high. Only 16% of organizations report a high ability to mitigate third-party API risks.[21]
Use this as a one-page launch checklist:
| Stage | Key Checkpoint |
|---|---|
| Partner fit | Business case and USD return target approved |
| Data access rules | Scopes, retention, and usage limits approved |
| Compliance checks | Security review and required attestations complete |
| Technical setup | Sandbox access, credentials, and docs verified |
| Test cases | Functional, security, and performance tests passed |
| Launch readiness | Go-live checklist, rollback plan, and monitoring approved |
| Account management handoff | Named owners, cadence, and offboarding triggers set |
Assign each item a named owner and a mm/dd/yyyy due date.
Over time, this process shows up in numbers leadership cares about: faster time-to-onboard, fewer incidents, lower integration costs, and clearer visibility into which partners are driving real growth.
Treat onboarding as a lifecycle process, not a one-time setup.[1][5] Done well, it helps partnerships scale with control.
Treat onboarding as a structured process, not a string of one-off events. Start by reviewing the predefined milestones to spot the bottleneck. It may sit in technical integration, team training, or data access rules.
Once you find the issue, log it with a severity rating, a named owner, and a deadline. Then use regular operating meetings to track progress based on evidence, not guesses, and keep the partner moving toward certification and launch.
High-performing API partner programs usually aim to certify partners within 30 to 60 days. Many companies also use a 90-day onboarding playbook with clear technical and business milestones to help partners move into operational status without a lot of friction.
Setup time can vary. Legal review, technical work, and training often move at different speeds. That’s why a structured process matters: it cuts delays and helps partners get to first revenue faster.
After launch, the main account management team should own the partner relationship.
Set day-to-day compliance and control duties in a pre-launch RACI, so ownership doesn't get split across teams. Contracts should list both primary and backup contacts. They should also spell out each control owner and the escalation path, which helps support accountability and regulatory readiness.